

Place the light directly over the sore area of your lower back, keep it close and square to the body, and hold it steady for the full session. In most office-chair setups, a wrap or pad is easiest to keep aligned, while a panel works best when aimed at your lumbar curve from a short distance behind or beside the chair.
Does your lower back start to ache halfway through the workday, right when you’re answering emails and cannot realistically lie down on the floor? Red light can be practical in this situation because the main advantage of a seated setup is simple, repeatable placement you can maintain several times a week. The goal is to get the chair positioning, distance, angle, and safety adjustments right so the session is more likely to help instead of becoming another gadget you stop using.
Why positioning matters more than people expect
Photobiomodulation uses red and near-infrared light to influence cellular signaling, inflammation, and tissue repair, but those effects depend heavily on where the light lands and how consistently it reaches the target area. For lower back pain, the target is usually the lumbar muscles and soft tissue just above the belt line, not your entire back and not the chair itself.
Nature’s review of red-light therapy notes that near-infrared light tends to penetrate deeper than shorter visible wavelengths. That matters in the office because if your device includes both red and near-infrared output, you usually want the emitters centered over the thickest, most painful part of the lower back rather than spread too high into the mid-back.
In real chair-side setups, the most common mistake is not too little time. It is poor alignment. If the device slides off the lumbar area, points through a thick hoodie, or shines at an angle that misses the curve of your lower back, you reduce the useful dose before the session is even over.
The best seated position for your lower back
Aim for the lumbar band, not the whole spine
Red light therapy is being studied for pain and inflammation, but it is not a whole-body shortcut when your problem is one tight, irritated region from sitting. The practical target zone is usually a horizontal band across the lower back, roughly from the top of the pelvis to a few inches above it, covering the muscles on both sides of the spine.
A good rule is to position the center of the device over the spot you would instinctively rub with both hands after sitting too long. If your pain is one-sided, shift the device slightly toward that side, but still keep some coverage across the middle so the light reaches the surrounding muscle that often tightens in response.
Match the angle to the natural curve of the chair
Professional and home devices come in panels and pads, and each behaves differently in a chair. The lower back is not flat, so the beam should meet your lumbar curve as directly as possible. If you use a panel behind you, do not leave it pointing straight into the chair back. Tilt it so the light faces the inward curve of your lower spine.
If your chair has deep cushioning, sit a little forward so the device is not blocked by thick padding. If the backrest reclines, a slight recline often helps because it opens the angle between your ribs and pelvis and exposes more of the lumbar area to the light.
How to position each device type while sitting

Device type |
Best seated setup |
Best for |
Main limitation |
Wrap or pad |
Strap it flat across the lower back, centered over the painful area |
Consistent placement during work |
Can shift if the chair is slippery or you slouch |
Place it behind the chair or slightly off to one side, aimed squarely at the lumbar curve |
Broader coverage and less contact pressure |
Distance and angle are easy to get wrong |
|
Hold or prop it against the sore spot for short sessions |
Small, specific trigger points |
Hard to maintain even coverage while typing |
A wearable wrap is usually the most office-friendly option because it keeps the light touching or nearly touching the target area. Brown Health notes that red light is often used for muscle and joint pain, and for a seated worker that convenience matters because a treatment you can keep in place tends to be more useful than a stronger setup you rarely use.
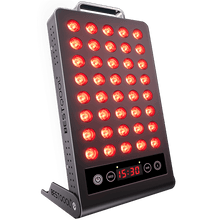
A small panel can work well if you have space behind your chair. Keep it close enough that the light still feels directed at your back rather than diffused into the room, and make sure the panel is perpendicular to your lumbar area, not to the floor. If the panel is too low, it will hit the seat back. If it is too high, it will mainly reach the area from the kidneys to the ribs and miss the sore band lower down.
A handheld device is best saved for a focused hot spot just to the right or left of the spine. It is less ideal for a full work session because your coverage becomes uneven the moment you shift position or start multitasking.
What to wear, how long to sit, and how often to repeat it
Harvard Health emphasizes that results depend on regular use. In practice, that means bare skin or a very thin shirt is better than treating through a sweatshirt, jacket, or other thick office clothing. Less fabric between the device and your skin usually means less wasted light.
Home and clinic protocols vary widely, so your first priority should be following the manufacturer’s instructions for your exact device. If your device offers both red and near-infrared settings, lower back pain usually makes more sense with near-infrared included because the target tissue is deeper than surface skin concerns.
A practical office rhythm is to use the device at the same point in your day, such as mid-morning or mid-afternoon when your back typically stiffens. That pattern does two useful things: it makes adherence easier, and it lets you judge whether the session reduces stiffness when it would normally peak. If you notice warmth but no relief after consistent use, the problem is often placement, not necessarily the therapy itself.
What the evidence supports, and where it is still uncertain
UCLA Health reports that literature reviews have found potential benefits, and University Hospitals also describes encouraging signals for pain and inflammation. That is enough to justify thoughtful home use as part of a broader recovery plan for desk-related lower back pain.
The caution is that Stanford’s review says the strongest evidence is still limited. That likely reflects inconsistent device strength, dose, and treatment schedules across pain studies rather than clear proof that it cannot help. For a seated office worker, the practical takeaway is to treat red light as a reasonable adjunct, not a stand-alone fix for every kind of lower back pain.
If your pain clearly comes from posture, long sitting, and muscle tightness, red light may fit well alongside walking breaks, lumbar support changes, and mobility work. If your pain shoots down the leg, wakes you at night, follows a fall, or comes with numbness, weakness, fever, or bladder or bowel changes, the chair setup is not the main issue and you should get a medical evaluation first.
Safety points that matter in an office
Cleveland Clinic notes that at-home devices are generally considered safe, but overuse and eye exposure still matter. Even for lower back treatment, wear eye protection if your device instructions call for it, and do not improvise longer sessions just because the treatment feels gentle.
Harvard Health advises extra caution if you take medications that increase light sensitivity. If that applies to you, or if you have a history of skin or eye cancer, it is worth checking with a clinician before making office sessions routine.
The best office-chair setup is the one that keeps the light centered on the lumbar area, close to the body, and easy to repeat without fuss. If you can sit slightly forward, expose the lower back, keep the device square to the sore area, and use it consistently, you give the therapy its best chance to help while staying realistic about what it can and cannot do.


 Small
Small

 Moderate

 Moderate

 Moderate

 Full
Full

