

Yes, usually, but only when the structure is stable and the mounting method is rated for the panel’s weight and shape. In most home gyms, a power rack is a better option than a basic squat stand because it offers more attachment points, better balance, and less tip risk.
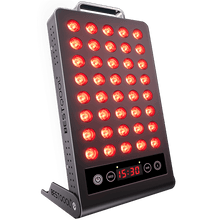
A red light therapy panel can usually be mounted on a home gym power rack, and sometimes on a squat stand, but only if the structure is stable and the mounting method is rated for the panel’s weight and shape. In practice, a power rack is usually the better candidate than a basic squat stand because it offers more attachment points, better balance, and less tip risk.
If your recovery setup is already crowded with barbells, plates, and a panel leaning against the wall after every workout, a stable mount can make a real difference. Most home panels work best when you can keep them at a repeatable distance of roughly 6 to 24 inches for about 5 to 20 minutes, so an easy, reliable setup often determines whether you use it consistently or skip sessions.
Why People Want to Mount a Panel on a Rack
A home gym is a logical place for red light therapy because recovery habits are easier to maintain when they sit next to training habits. One article on a home-gym recovery setup specifically includes the home gym as a practical location for pairing light sessions with workout recovery, and the same idea appears across setup advice: easier access usually improves consistency.
That matters because the benefits people usually want in a gym setting are recovery-related rather than cosmetic alone. Red and near-infrared light are commonly used for muscle recovery, circulation support, and joint comfort, while the deeper-penetrating near-infrared range is often preferred for muscles and connective tissue rather than skin-only goals, as described in red light therapy basics.
The Short Answer: Power Rack Usually Yes, Squat Stand Maybe
A power rack is often a reasonable mounting surface because it is heavy, stable by design, and built to handle load without wobbling. That does not automatically make every rack mount safe, but it does make the structure more forgiving than a freestanding squat stand. This is an inference from general mounting guidance rather than a rack-specific rule: setup sources consistently emphasize stability, fixed distance, and secure mounting, including panel stand selection and secure hanging hardware.
A basic squat stand is less ideal because many models are narrower, lighter, and easier to shift if you bump the panel or pull on an adjustment strap. If your stand is not bolted down or plate-loaded for stability, mounting a panel to it can turn a convenience upgrade into a tipping hazard. In practical terms, a 20-minute recovery session is not worth trusting a stand that already moves when you rerack a barbell.
What “Safe to Mount” Really Means
For a red light panel, safe mounting is less about the light itself and more about mechanical stability, distance control, and normal use posture. Most home guidance recommends using panels at a stated distance, often around 6 to 12 inches or up to 24 inches depending on output and goal, because dose falls as you move farther away, and too much or too little exposure can both reduce benefit through a biphasic dose response, as explained in red light therapy basics and safety guidelines for red and near-infrared light.
A good rack mount should do three things well: hold the panel without sway, place the treatment area directly in front of the LEDs, and let you return to the same height and distance every session. If your panel hangs crooked, vibrates when plates hit the floor, or sits too close to moving bars and J-cups, the rack is the wrong mount even if it technically fits.
When a Rack Mount Makes Practical Sense
A rack mount makes the most sense when you already do standing recovery sessions and want quick access after training. That matches how larger panels are often used: standing works well for the torso, back, quads, calves, and full front- or back-body exposure, while seated setups usually fit smaller targeted devices better. General room setup for red light therapy and panel stand selection both point toward matching the mount to how you actually plan to use the panel.
A simple example is a mid-size panel aimed at chest height on the outside upright of a power rack. If you stand about 12 inches away for a 10- to 15-minute post-leg-day session, you can cover quads, knees, and lower torso with minimal repositioning. That kind of repeatable routine is more likely to survive day-to-day use.
When a Rack Mount Is a Bad Idea
A rack mount is a poor choice when the rack is in constant motion, the uprights are crowded with attachments, or the panel would sit where the bar travels. It is also a bad choice if the panel is heavy enough that the manufacturer expects a wall bracket, floor stand, or door-hanging kit instead of an improvised clamp system. Installation advice such as secure hanging hardware and panel setup guidance repeatedly emphasizes secure hardware, flat placement, ventilation, and unobstructed space.
This is also where power racks and squat stands separate. A four-post rack gives you room to mount the panel on an outer upright away from the lifting lane. A two-post stand often does not. If the panel would end up beside a swinging plate, under a pull-up station where sweat could drip onto it, or behind the bar path during bench setup, skip the idea.
Power Rack vs. Squat Stand
Setup |
Usually Better For |
Main Advantage |
Main Concern |
Power rack |
Regular standing sessions and larger panels |
Better stability and more mounting options |
Interference with lifting attachments |
Squat stand |
Only light, small panels on very stable stands |
Simpler footprint |
Higher tip and wobble risk |
Floor stand |
Flexible placement around the gym |
Easy repositioning |
Takes floor space |
Wall mount |
Dedicated recovery zone |
Very stable and space-efficient |
Permanent drilling and fixed location |
That comparison aligns with panel stand selection and general mounting logic in home-use recovery equipment recommendations, which treats red light devices as practical recovery tools that need to fit your space and routine, not just the spec sheet.
The Most Important Checks Before You Mount Anything
The first check is whether your panel manufacturer actually supports the mounting method. If the manufacturer only provides a door hook, wall bracket, or dedicated stand, that is a strong sign that a DIY rack mount is outside the intended use. The second check is weight and leverage. A panel may not look especially heavy, but when it hangs off a bracket or clamp arm, leverage increases the stress on the attachment point quickly.
The third check is clearance. You need enough room to stand or sit at the recommended distance without backing into plates or a bench. The article on a home-gym recovery setup notes that spacing and low interruption matter, which sounds basic but often determines whether a cramped gym corner gets used consistently.
The fourth check is eye comfort and heat comfort. Even though red light therapy is generally presented as non-heating and non-ionizing, bright panels can still be uncomfortable at close range, and protective goggles are commonly advised when facing the light directly, especially around the face, as noted in red light therapy basics and safety guidelines for red and near-infrared light.
A Practical Mounting Approach That Usually Works

If you have a heavy, stable power rack, the safest practical approach is to treat it like a substitute wall for a manufacturer-approved bracket or a robust accessory arm that is clearly rated for the load. The panel should mount on the outside of the rack, not inside the lifting bay, and it should face the body squarely so the dose stays even across the treatment area. The goal is not elaborate engineering; it is a panel that stays put at the same height every time.
If your panel is small, a dedicated stand may still be the cleaner solution. Stand guides exist for a reason: they let you change height and angle without turning your rack into a permanent hardware experiment. The advice in panel stand selection makes this point well by treating stands as positioning tools that improve comfort and flexibility, not as performance upgrades.
Dosing Still Matters More Than the Mount
A great mount does not fix poor dosing. For most home users, the basics remain consistent across consumer and clinical-style sources: bare skin, a realistic treatment distance, and session lengths usually in the 5- to 20-minute range per area, repeated several times per week. Those patterns are broadly consistent in red light therapy basics, home-device use tips, and safety guidelines for red and near-infrared light.
For recovery use in a gym, that often means one simple routine: mount the panel so your quads or back sit about 6 to 12 inches from the LEDs, run 10 to 15 minutes after training, and keep the schedule consistent for a few weeks before judging the results. The mount’s job is to make that routine easy enough that you actually follow it.
A Reasonable Bottom Line
If you have a sturdy power rack, a red light therapy panel can be mounted there successfully, but only when the attachment method is secure, the panel sits outside the lifting path, and the setup preserves the right treatment distance. A squat stand can work in limited cases, but it is usually the weaker option because the stability margin is smaller.
Choose the mount that makes correct use effortless. If the rack helps you recover more consistently without creating a safety compromise, it is a good solution. If not, a proper stand or wall mount is the smarter choice.


 Small
Small

 Moderate

 Moderate

 Moderate

 Full
Full

