

You do not need a built-in treatment room to use red light therapy effectively at home. The key is a truly portable device, a simple setup, and consistent control of distance, session length, and body position.
Is your recovery corner stuck in the one part of the home gym with no convenient plug, right where you want to stretch, cool down, or treat sore legs after training? The good news is that targeted red light sessions can still be practical at home because smaller handhelds, wraps, and compact devices are designed for localized treatment and short, repeatable sessions. With the right setup, you can power, position, and use the device without turning your gym into a wiring project.
Start With the Right Kind of Portable
The first decision is not where to stand. It is whether your device is truly portable for your goal. A targeted recovery device makes the most sense when you are treating a knee, shoulder, elbow, low back, or one muscle group after training, because handheld formats are built for localized use and are easier to bring into a home gym than a large panel. That matters when the obstacle is power access, not just treatment time.
This is where real-world practicality matters more than marketing. A compact device is only portable if you can hold it comfortably or position it without constantly shifting during the session. In most homes, that means a handheld wand, a wrap, or a smaller pad for one area at a time, not a full-size panel that still requires a fixed spot and stable clearance. If your goal is post-leg-day quad recovery, a small wrap or handheld is easier to use beside a bench than a tall panel that forces you to rearrange the room.
Device specs matter more than flashy features. Wavelength disclosure is one of the clearest quality markers to check before you worry about convenience. For most home users, red light around 630 to 660 nm is more relevant for surface-level skin and tissue concerns, while near-infrared around 810 to 860 nm is commonly used for deeper targets such as joints and muscle. A common all-purpose combination is 660 nm plus 850 nm, which is why many recovery-focused devices emphasize both.
What to Do When There Is No Outlet Nearby

The cleanest solution is to use a portable LED device that does not force you to build your routine around a wall socket. In practice, that means choosing a rechargeable handheld, a compact wrap, or another small targeted device over a larger panel when your gym layout is fixed. The more the device depends on exact placement and a permanent stand, the less forgiving it becomes in a space without nearby power.
If your device is corded, the safest practical move is usually to bring your body to the power source for the session rather than forcing the device to reach your preferred workout spot. That might mean sitting on a stool near an outlet for 10 minutes after training, then returning to the rest of your routine. This preserves what matters most: consistent distance, a steady angle, and a calm position you can repeat several times per week.
That consistency matters more than making the setup look polished. At-home dosing guidance comes back to the same point: use clean, uncovered skin, set up in a comfortable and safe space, and keep sessions repeatable. In a home gym, the best spot is often the least glamorous one, such as a chair near an outlet, because it helps you finish the session instead of skipping it.
How to Set Up the Session So the Dose Stays Useful
Red light therapy is not a more-is-better tool. The biphasic dose response is why experienced users avoid the common mistake of pressing the device too close to the body for too long. Too little light may do very little, but too much can become counterproductive. That is why distance and time are not minor details; they are the treatment.
For many home devices, a practical starting range is about 6 to 12 inches from the target area for deeper muscle or joint work and around 10 to 20 minutes per area, several times per week, depending on the device’s output and the maker’s instructions. If you are using a recovery wand on a sore knee after squats, a realistic session is sitting still with the device held at the tested distance for the full treatment window, not waving it around while walking across the room.
The angle matters too. Light works best when it reaches bare skin cleanly and directly. If the device is tilted away, blocked by clothing, or moving throughout the session, the real dose changes even if the timer does not. This is one reason a simple seated setup often works better than trying to use the device while putting away weights or stretching between sets.
A Practical Home-Gym Routine That Actually Fits Real Life
A good home-gym routine usually pairs treatment with a moment that already exists. Consistency matters more than chasing one long session. For example, if you train at 6:30 PM, you might finish your workout, towel off, expose the target area, sit near the nearest outlet, and run one 10-minute session on each sore region while your breathing settles and your heart rate comes down. That is easier to repeat than promising yourself a 40-minute full-body protocol later.
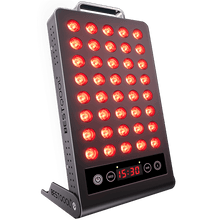
There is also a clear tradeoff between convenience and coverage. A portable handheld format is excellent for one or two problem areas, but it is slower if you want to treat both knees, hamstrings, and low back in one evening. A larger panel covers more area at once, but once you need more floor space, a stand, and a reliable outlet nearby, it stops solving the no-outlet problem and starts creating a room-design problem instead.
What to Avoid in a No-Outlet Setup
One of the biggest mistakes is trying to improvise with generic red bulbs, heat lamps, or unclear adapters just because they seem easier to power. Verified device output matters because wavelength and irradiance claims are not interchangeable, and poor-quality devices can produce uneven output or hot spots. That means the simple workaround can actually make dosing less predictable.
Another mistake is ignoring the manual and assuming that closer and longer must be better. Portable-use guidance and the testing discussed in Wavelength disclosure point in the same direction: stay within the tested distance range and follow the brand’s stated timing. If the device is near your face, goggles or closed eyes may be sensible for comfort and safety. If you are pregnant, have epilepsy, take photosensitizing medication, or want to treat a medical condition rather than support general wellness or recovery, check with a clinician before starting.
Pros and Cons of Using a Portable Device in a Home Gym
Approach |
Main Advantage |
Main Limitation |
Handheld or compact portable device |
Easy to use without redesigning the room; good for knees, shoulders, elbows, and low back |
Slower for multiple body parts |
Larger corded panel |
More coverage and less repositioning |
Harder to use well when there is no nearby outlet |
Improvised DIY light source |
May seem cheap or convenient |
Unclear wavelength, dose, coverage, and safety |
When Portable Is the Better Choice
If your main goal is muscle recovery, joint comfort, or spot treatment after training, portable often wins on adherence alone. A device you can use three to five times per week in a repeatable way is usually more useful than a bigger device you rarely set up. The strongest home routines are rarely the most elaborate. They are the ones you can repeat without guesswork, clutter, or dose creep.
A simple setup, a disclosed wavelength profile, bare-skin exposure, and steady timing will take you further than chasing a complicated gym installation. When there is no dedicated outlet nearby, the best answer is usually not more gear. It is a smaller, better-matched device and a routine you will actually keep.


 Small
Small

 Moderate

 Moderate

 Moderate

 Full
Full

